Sebelumnya anda harus yakinkan bahwa file htaccess.txt bawaan asli joomla anda telah di rename/diubah menjadi .htaccess , agar proses redirect ini dapat berjalan sebagai mana mestinya.
Adapun cara-cara melakukan modifikasi pada .htaccess situs joomla anda agar domain website joomla menjadi www adalah sebagai berikut:
1. Masuk CPANEL hosting anda, kemudian masuk ke File Manager.
2. Jika situs Joomla anda berada di root public (PUBLIC_HTML) artinya anda cukup mencari didalam path /home/namauser/public_html/ . Namun jika berada pada direktori / folder lainnya, maka lakukan perubahan di sub directory tersebut atau /home/namauser/public_html/namafolder/ .
3. Cari file .htaccess asli joomla yang sudah anda ubah dari htaccess.txt menjadi .htaccess , dan bukan .htaccess bawaan hosting selagi website masih kosong. Jika ternyata anda belum melakukan hal itu, anda bisa me rename filenya, namun jika ternyata masih tidak bisa, anda bisa lakukan editing pada file .htaccess bawaan hosting anda dengan cara meng copy seluruh isi htaccess.txt joomla anda ke dalam .htaccess hosting anda.
4. Dari daftar urutan script .htaccess joomla default anda akan melihat script nya sebagai berikut:
##
# @version $Id: htaccess.txt 13415 2009-11-03 15:53:25Z ian $
# @package Joomla
# @copyright Copyright (C) 2005 – 2008 Open Source Matters. All rights reserved.
# @license http://www.gnu.org/copyleft/gpl.html GNU/GPL
# Joomla! is Free Software
##
#####################################################
# READ THIS COMPLETELY IF YOU CHOOSE TO USE THIS FILE
#
# The line just below this section: ‘Options +FollowSymLinks’ may cause problems
# with some server configurations. It is required for use of mod_rewrite, but may already
# be set by your server administrator in a way that dissallows changing it in
# your .htaccess file. If using it causes your server to error out, comment it out (add # to
# beginning of line), reload your site in your browser and test your sef url’s. If they work,
# it has been set by your server administrator and you do not need it set here.
#
#####################################################
## Can be commented out if causes errors, see notes above.
Options +FollowSymLinks
#
# mod_rewrite in use
########## Begin – Rewrite rules to block out some common exploits
## If you experience problems on your site block out the operations listed below
## This attempts to block the most common type of exploit `attempts` to Joomla!
#
## Deny access to extension xml files (uncomment out to activate)
#
#Order allow,deny
#Deny from all
#Satisfy all
#
## End of deny access to extension xml files
RewriteCond %{QUERY_STRING} mosConfig_[a-zA-Z_]{1,21}(=|\%3D) [OR]
# Block out any script trying to base64_encode crap to send via URL
RewriteCond %{QUERY_STRING} base64_encode.*\(.*\) [OR]
# Block out any script that includes a


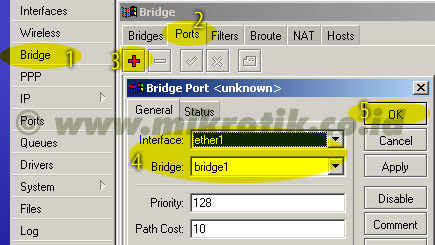
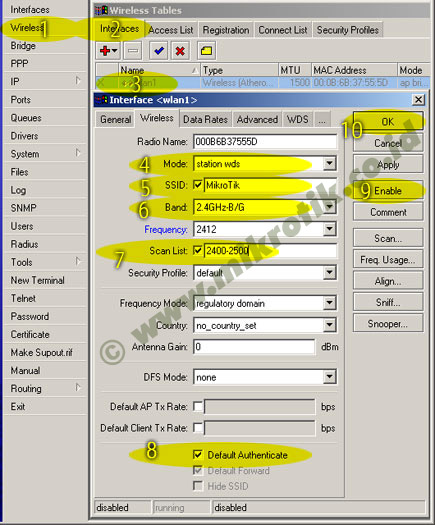
 4. Selanjutnya adalah setting wireless interface. Kliklah pada menu Wireless (1), pilihlah tab interface (2) lalu double click pada nama interface wireless yang akan digunakan (3). Pilihlah mode AP-bridge (4), tentukanlah ssid (5), band 2.4GHz-B/G (6), dan frekuensi yang akan digunakan (7). Jangan lupa mengaktifkan default authenticated (8) dan default forward (9). Lalu aktifkankanlah interface wireless (10) dan klik OK (11).
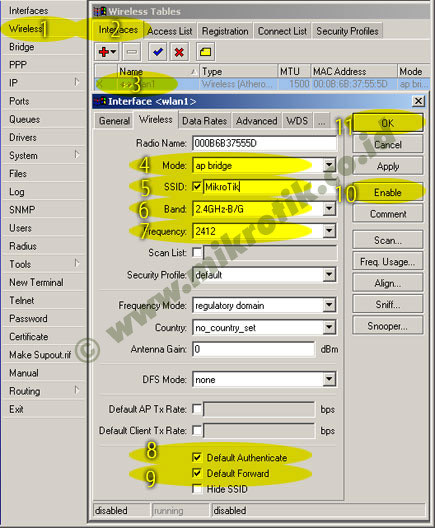
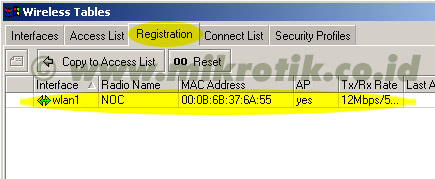
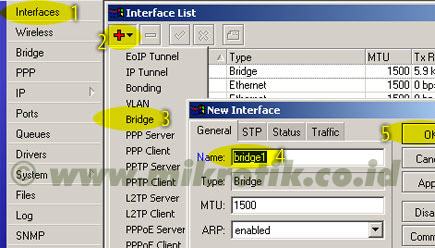
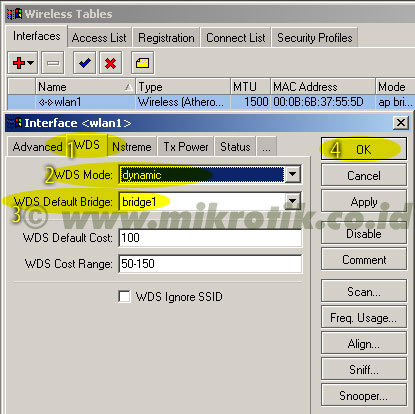 6. Langkah selanjutnya adalah menambahkan virtual interface WDS. Tambahkan interface WDS baru seperti pada gambar, lalu pilihlah interface wireless yang kita gunakan untuk WDS ini. Lalu tekan OK.
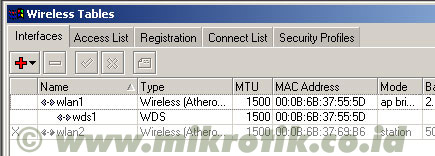
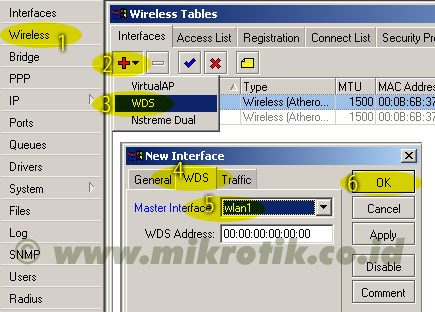 7. Jika WDS telah ditambahkan, maka akan tampak interface WDS baru seperti pada gambar di bawah.